
"Nokia E71x is the Thinnest Smartphone " that will soon be available with the nation's largest fastest 3G network.
Nokia E71x, the thinnest smartphone, helps you combine your personal and business life. With a seamless user interface, it equipped mobile email, and personal information management features, the wonderful Nokia E71x helps you organize your life at lesser effort. It is packed with Built-in GPS with AT&T Navigator, instant messaging, Video Sharing, Wi-Fi, and Internet access. You can stay connected with the things that are very valuable to you so you can do more while you are on the move. Nokia E71x is equal to the combined capabilities of all your pocket devices.
How to delete your unused yahoo account
Posted by nika perales | 3:57 AM | E-mail, Tutorials, Web | 0 comments »If you want to delete your unused yahoo account then follow these steps
Go to https://edit.yahoo.com/config/delete_user
Login using the yahoo account ID that you want deleted.
When asked for the password once again,enter it, and click on “Terminate this account”. And it will be deleted
How to access a remotely viewable camera that is behind a firewall or router or is using a dynamic IP.
Posted by nika perales | 8:29 PM | Dynamic DNS, Surveillance Camera, Tutorials | 0 comments »This illustrated step-by-step guide is intended for people or businesses that are using remotely viewable cameras in their establishments, Homes or Offices which are behind firewalls, routers or is using a dynamic IP.
Step 1) Create an account with with No-IP.com, and verify your account.
take note of your username and password as you will need this later.
Step 2) login in to NO-IP.com using the account you created above. Once you are logged in Click on Add a Host, see picture below
Step 3) Next fill in the necessary Details
Hostname: This will be the address that you will use to view your camera using
the web. Note beside the Hostname text field is a dropdown list that allows you to choose from any of the NO-IP.com free Domains. Ex. myRemoteCameraViewer.hopto.org
This means that I will use the address http://myRemoteCameraViewer.hopto.org to view my camera
Host Type: Select (o) DNS Host (A)
Leave the rest as is and click on Create Host, refer to picture below
Step 4) Go to Download Client. Refer to picture below
Step 5) Install the Client you downloaded in step 4 to the computer that serves as your DVR Server, Just Click next until the set-up finishes.


Step 6) Fill in the username and password, use the account you created at Step 1
Step 7) You should see the hostname you used back at Step 3, select that from the list by clicking on the box beside it. Note: when you click the hostname you will see a message similar to
“[Sun 11:26] Updating host: myremotecameraviewer.hopto.org
[Sun 11:26] myremotecameraviewer.hopto.org: DNS is current, no update needed.”
And that’s it you can start viewing your camera from anywhere in the world using the hostname that you chose at step 4. Enjoy and Start viewing your camera
How to forward incoming emails for Hotmail
Posted by nika perales | 3:27 PM | E-mail, Tutorials, Web | 0 comments »This is a step-by-step illustrated guide on how to enable mail forwarding for Hotmail.
This is very useful when you have so many email accounts and you want all emails to be forwarded to a single email address.
Step 1 ) Login to the hotmail account that you wanted to forward incoming emails to another email account.
Step 2) Click Options at the upper right corner of Hotmail Windows, as shown in the picture below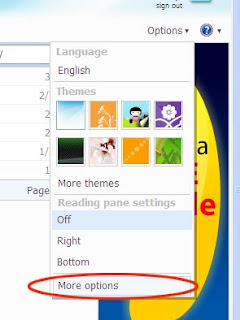
Step 3) Select Forward mail to another e-mail account, see picture below
Step 4) Select Forward your mail to another e-mail account , and fill in the forwarding address at the box provided.
Step 5) Finally Click Save, All emails received by this email address will then be forwarded to the email address specified in step 4.
How to forward incoming mails for Gmail
Posted by nika perales | 3:07 PM | E-mail, Tutorials, Web | 0 comments »This is a step-by-step illustrated guide on how to enable mail forwarding for gmail.
This is very useful when you have so many email accounts and you want all emails to be forwarded to a single email address.
Step 1 ) Login to the Gmail account that you wanted to forward incoming emails to another email account.
Step 2) Click on Settings located at the upper right corner of the gmail window. 
Step 3) Select Forwarding and POP/IMAP by clicking on it. 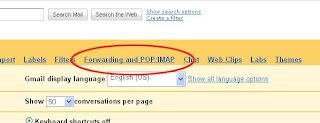
Step 4) Select Forward a copy of incoming mail to and type the email address that will receive the forwarded emails. Also in the box beside the forwarding address you can choose if you want Gmail to keep copy of the forwarded emails or delete it after forwarding
Step 5) Click Save Changes, All emails received by this email address will then be forwarded to the email address specified in step 4.
How to move my documents to another location
Posted by nika perales | 7:45 AM | Windows Tutorials, Windows XP Guides | 0 comments »Moving my documents to another drive, or location saves you the time of having to backup your files when you need to reformat your PC or when you delete your windows user name.
Steps in Moving My Documents to another location
1)Right Click the My Documents folder on your Desktop and click properties
2) Click on Move, and locate the drive or folder where you want My Documents moved. Click on new folder if you want to create a new folder where you want your documents to be placed
3)Click Ok, then click Apply. You will be then prompted by a message like the 1 below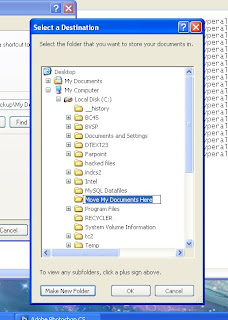
4)Click Yes to confirm that you want the My Documents moved...
now everytime you do a reformat you need not worry about losing your important documents because you already have them on a separate drive.
Note: This guide also works when you want to point back My Documents folder on your desktop after reformatting to the location where you have moved it during the previous times. Just locate the folder that contains all your documents, instead of a new location and then proceed with the rest of the guide
Illustrated Windows Vista Installation Part 2
Posted by nika perales | 5:29 AM | Tutorials, Windows Tutorials | 0 comments »Illustrated Windows Vista Installation continued
Step 7 – In this window, you are given a choice between upgrading an existing windows vista installation or doing a fresh install. For the sake of this guide, we are going to choose Custom (advanced) option which will install a fresh copy of Windows from scratch.
Note: The other option is disabled by default because we are booting from the Windows Vista installation disk
Step 8 – In this part we need to select the partition where you want to install Windows Vista. If you are doing a clean installation on your PC, then you should see the drives listed as C: , D: and so on… If you are installing windows vista on a newly bought computer or on a new and unpartitioned drive, you will see the drive listed as Disk0, Disk1 and so on.., depending on the number of hard drives you have inside your computer.
Installing on a unpartitioned hard drive or on a new PC: Select the unpartitioned drive from the list and click on Advanced. And Click Next, setup will create a partition using the on all the available disk space, and format it.
If you are doing a clean installation: Select the partition where you want to install windows vista, default is C:. Click Advaced and press format, use NTFS and then Press next.

Step 9 - Windows starts the installation process and starts copying all the necessary files to your hard drive and you will be shown image like the one below. It will go through various stages of the setup and will reboot your system few times.
Note: You have to wait until windows vista installer finishes copying the necessary files to your hard drive, your computer will reboot several times, so avoid pressing any key during the reboot to avoid booting from the DVD. Wait until you see a window that will ask you for your username and password.

Step 10 - After the windows vista installations have finished copying files to your hard drive, you will be presented with a window similar to the one below. At this stage you need to choose a user name, password and a picture for your user account. The account you create here is the Administrator account which is the main account for your Windows Vista that has all the privileges. Click next to continue.
Note: Avoid forgetting the username and password you used here, as that would result to you being locked out of the system and would be unable to use your computer unless you redo everything.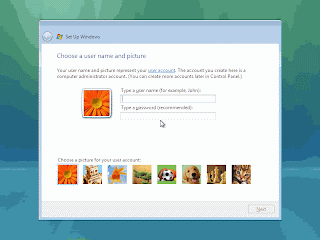
Step 11 – In this next step you can set your computes name and desktop background. Click next to continue to the next step
Step 12 – In this part you will be asked if you want to help protect Windows automatically. Choose "Use recommened settings" to continue.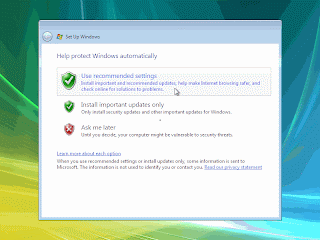
Step 13 – Now in this part review your time and date settings and adjust them accordingly. 
In this next screen you will be asked to select your computers current location. You can choose between home, work, public location. Choose whichever it is to continue. You will then see a "Thank you" screen which confirms the end of the interactive installation process. This is not the end of the setup process. There are still many after installation configuration to be done. Click next to continue.
Step 14 - Windows will then run a benchmark type of application which will check the performance of your system. You will see a status bar at bottom which shows the progress. Once the process has completed you will be presented with the login screen. 


Step 15 - Finally fill in the username and password you used in the previous steps to login to windows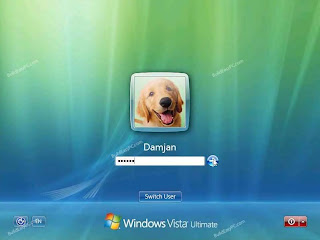
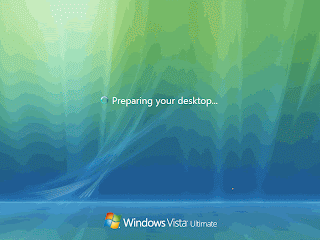

Step 16 – As soon as you are logged in, you will then be presented with welcome centre screen. You can utilize the welcome centre to configure, customize, and update Windows Vista.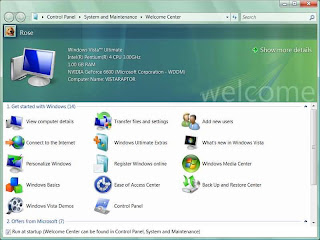
Step 17 – Finally, Install all the device drivers for your computers and you are all set.
Window Vista Installation Part 1
to see the rest of the guide tutorial
Illustrated Windows Vista Installation
Posted by nika perales | 5:15 AM | Tutorials, Windows Tutorials | 0 comments »This is a step-by-step guide provided for those people who want to learn how to install windows vista by themselves, learning how to do this will save you the money you spend to pay a tech guy.
A clean installation is always good if you want to get rid of those nasty viruses that lurks your PC or just want to have a fresh start.
Note: Before you try install vista, kindly check Windows Vista System Requirements to check if your computer meets the necessary system requirements for your version of Windows Vista.
Note: Remember to have your computers Driver CD ready and your Windows Vista Product Key handy. In case that you do not have the Windows Vista drivers for all your computers hardware, try to download them first and have them burned into a blank disk before you proceed with the rest of this guide. Also, do not forget to back-up your important files on your C: drive.
Windows Vista DVD is bootable. Check your computer if you have First Boot device set to CD-ROM / DVD- ROM, by default most computers are already set do this. But just in case it’s not set to boot from CD-ROM or DVD-ROM at boot, try to search over the internet or consult your computers manual on how to set the First boot device to cd-rom or dvd-rom drive.
If you have already set
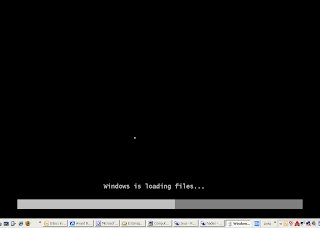
Step 1 – Place the Windows Vista DVD in to your computers DVD-ROM drive and restart your PC. Windows Vista will automatically load set-up and you will be seeing the screen below.
Step 2 – In the next screen you will see a window that allows you to setup the language, Time and Currency format and the type of keyboard localization you want to use. Choose the Language you want to use and the Time and Currency format. You can leave the Keyboard part as is, as it works with most keyboards in the US 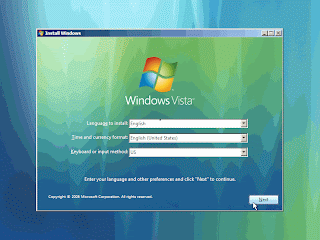
Step 3 - On the next screen you will see a window that allows you to choose between a new Installation of Windows Vista and Repairing an existing Windows Vista Installation. For this guide, we will use new Vista installation. So, go ahead and click on Install Now. 
Step 4 – Now fill in the your Windows Vista Product key, make sure that you type them correctly as they appear at the back of your Windows Vista DVD case.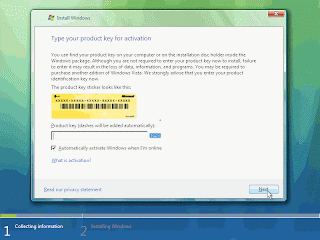
Step 5 – In the event that you do not have your product key. Just click on Next, and choose the version of Windows Vista that you have, and then click Next.
Note: Although you may be able to select any version of Windows Vista from the list shown, It is never a good idea to choose one that is not the same as the version stated at the on your Windows Vista DVD case. 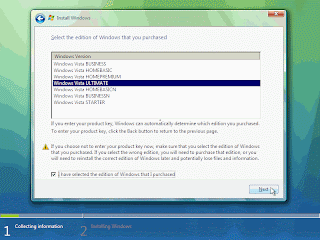
Step 6 – In this part you have to put a check [ / ] on the small white box beside “I accept the license terms” and then click Next.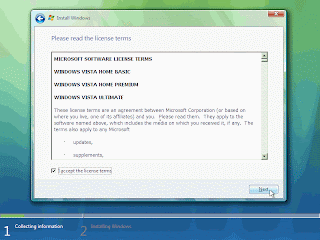
Window Vista Installation Part 2
to see the rest of the guide tutorial
How to get rid of acquiring network address message
Posted by nika perales | 4:01 PM | Windows Tutorials, Windows XP Guides | 0 comments »1) open windows explorer, then click on Tools > Folder Options
2) Click the view tab, and scroll down 'till you see
[ ] Show pop-up description for folder and desktop items.
remove the check in the box
3)Click Apply, then Click Ok
4) next Right Click on My Network Places and click Properties
5)right click on Local Area Connection and click Properties
at the bottom part uncheck the 2 boxes
[ ] Show icon in notification area when connected
[ ] Notify me when this connection has limited or no connectivity.
then click OK
C Program to Compute Area of Sector and Arc Length
Posted by nika perales | 9:37 AM | C Programming | 0 comments »For new coders out there here's a sample c program to compute Area of a Circular Sector and Arc length
Here's the code;
#include
#include
float ComputeSectArea();
float ComputeArcLength();
void main(void){
int choice;
float AreaSector,ArcLength;
clrscr();
printf("\nWhat would you like to do?");
printf("\n[1] Compute Area of Sector");
printf("\n[2] Compute Arc Length");
printf("\nEnter Choice: ");
scanf("%d",&choice);
if (choice == 1){
AreaSector = ComputeSectArea();
printf("\n Area of Sector is %.2f",AreaSector);
}
else {
ArcLength = ComputeArcLength();
printf("\n Arc Length is %.2f",ArcLength);
}
getch();
}
float ComputeSectArea(){
int theta;
int radius;
float area_of_sector,pi=3.14;
printf("\nPlease enter theta:\t");
scanf("%d",&theta);
fflush(stdin);
printf("\nPlease enter radius:\t");
scanf("%d",&radius);
fflush(stdin);
area_of_sector= ((float)theta / (float)360.00) * pi * radius * radius;
return area_of_sector;
}
float ComputeArcLength(){
int theta;
int radius;
float length_of_arc;
printf("\nPlease enter theta:\t");
scanf("%d",&theta);
fflush(stdin);
printf("\nPlease enter radius:\t");
scanf("%d",&radius);
fflush(stdin);
length_of_arc= ((float)theta / (float)180.00) * radius;
return length_of_arc;
}
How to fix errors with flash player
Posted by nika perales | 9:20 AM | Flash Player, Windows Tutorials | 0 comments »Have you upgraded your flash player recently and after which you were no longer able to watch videos that requires the flash player. Then this guide is for you. Here is what you should do.
the best thing you should do is to completely uninstall the old version of Flash Player. Go to Control Panel > Add or Remove Programs then Uninstall the old version of Flash Player. Then Restart your computer afterwards. Download the newest version of flash player and install.
Some cause why a computer freezes
Posted by nika perales | 5:10 AM | Windows XP Guides | 0 comments »If you are the type of person who spends a lot of time in front of your PC or Laptop, you probably have experienced that at some point your computer freezes and is no longer responding to your commands. While there are times that this can be fixed by a hard reboot (holding down the power key or pulling the cord) of the PC or Laptop. There is far better solution, especially if this situation keeps happening repeatedly over time! If you are worried about why your computer is freezing up and you would like to try to do something about it yourself without having to pay someone to do the job for you, you will find that there are quite a few different things that might be causing it. Take a look at some of the common causes why a computer or laptop freeze up and how to fix them.
The first thing to consider when your computer freezes is to look into the obvious. Look for a physical component to the problem; see to it that everything is plugged in securely. For instance, your mice might not be responding to your clicks because it is no longer in physical contact with your computer. Similarly, you might not be able to type if your keyboard is having issues. Always check for physical connection problems, because this is one of the most common problems seen as well as one easiest to fix.
Another possibility you could be facing is a computer virus infection or a particularly bad case of spyware. If your computer is connected to the internet in any way, then you are probably aware of the great possibility that harmful things like viruses, malwares and spywares will eventually find its way to your computer through the connection. There is a wide array of computer viruses out there that can cause your computer to freeze. This could possibly come to a point where in your computer constantly reboots, or it could come to a point where in application software’s take forever to load because the computer virus is already consuming the entirety of your systems resources thus resulting to a poor performance on your end. The best way to take care of such a problem is getting a good antivirus, and making sure that it is always up to date, so as to block new possible threats. Maintain a monthly schedule for performing virus scans so as to chck your system for such virus infections.
There are also times that registry errors can cause your computer to freeze. Registry entries will be half-erased, or duplicated over time as you install and uninstall softwares from your computer, which eventually slows your computer and at some point causing it to freeze. The best way to resolve such an issue is to have a good registry cleaner at your own disposal.
Finally, it is also likely that your computer would freeze due to failing computer hardware. So if you think that you are experiencing this type of problem, then you should always make sure to back up your important files so as to avoid losing them in the event that the hardware fails.
Take time in maintaining your PC. Always remember that it is not a normal circumstance that a computer freezes.
Things you need to consider when buying a new laptop
Posted by nika perales | 5:06 AM | Laptops | 0 comments »When you want to buy a new laptop, it is very important to keep in mind the very reason or purpose you have for buying one. You must first consider how the laptop would be used, would it be for office use, home use or for mobile gaming. It is not very likely to buy a laptop that’s intended for home use and use it for gaming. There are many things you need to consider before buying the laptop that you have chosen.
Screen Size:
Laptops come with several different screen sizes, from the small 9” laptops to the bigger 21” ones. You also need to decide which laptop you need for your specific purpose. The suggested size is 15" as this is big enough in most cases.
Connectivity:
Always be sure you get a laptop that has both Wireless and Bluetooth capabilities. As you will probably be moving from one place to another, and having this two capabilities will make connecting to other machines easier.
Memory:
Depending on your intended use for the laptop, you will probably need bigger RAM. Since RAM is becoming rather cheap nowadays it is pretty much advisable to get ones with at least 2GB to keep your laptop at optimum performance.
Storage:
Another very important thing to consider when buying a new laptop is the size of the storage device or hard drive. If you intend to keep a lot of files on the laptop, it is best to get a laptop with bigger hard drives of at least 120GB, or if not try invest in for an external storage that you can use when needed.
Processing Power:
Processing power is the most important thing to consider when buying a new laptop, the best thing is to do is to opt for something fast and consumes lesser power, so as to keep heat at a minimum and performance at best.
Display adapter or Video Card:
The choice for the right video cards are very important for people who intend to use their respective laptops for gaming or graphic editing as this part is responsible for providing you with better graphics handling capabilities.
There are quite several things that one needs to consider when planning to buy a new laptop. It is very important to choose one that matches your needs perfectly so as not to waste money especially during these days of financial crisis. Always make sure to go for a laptop manufacturer who provides excellent after sales service as this is very important specially when you are having trouble with the unit that you bought from them.
Never rush yourself to buying a new Laptop or PC.
Posted by nika perales | 5:02 AM | Laptops, Personal Computers | 0 comments »In this difficult time of the global financial crisis, it is rather quite unlikely to spend on something that is really not of great value or importance. While computers have become part of our lives in these present times, it is not very likely to buy a new PC or Laptop and not have something to eat just to be able to buy a new replacement. It is very much obvious that doing so would be a very bad idea.
As the years passed, RAM prices are becoming lower than ever, hard drives are becoming cheaply available and have come to grow in size, and stable flash memory devices like pen drives are very affordable. These all indicates that the new and more powerful advancements in computing technology are only months away from hitting the market. 64-bit processors, while having been available on the market for a quite awhile now, will gain new popularity in consumer markets. The deliberate death of older technologies like IDE and disk drives will end holding back the advancement in the part of hardware and software developers, and Intel had just released the Intel i7 Core the last quarter of last year.
With all these technological advances almost every day, the best way to waste your hard earned money is buying a new PC in the next few months. So, what can one do with their old machine that is no longer running like it used to, a few years back? The first step is to figure out why it has been running quite slower than it used to. If you have spent several years downloading, installing and updating a variety of software, then the problem could be as simple as mess that needs a little cleaning. Hardly ever is a slow-down PC or laptop performance caused by something that is physically wrong. In most cases, the symptoms of such failures are more obvious. Your PC or Laptop may not turn on, or you may not be able access your files, perhaps you have a defective videocard, damaged motherboard, damaged RAM or a bad hard drive. While most of these signs can seem critical, the most common hardware failures can easily be remedied by a knowledgeable computer technician. Never hesitate to ask for advice from someone who is well versed in repairing PC’s. Don’t ever go to a computer store for their opinions or suggestions regarding the viability of your PC or Laptop as they are more likely there to do one thing and that is to sell a new computer or laptop. Always go to a computer repair shop or call a local and reliable computer repair guy or company. Many of these computer repair specialist quite very good at extending the life and usefulness of your PC or laptop at a minimal cost.
The majority of consumers would benefit by having their old machines repaired at some point and then wait for the next generation of computer technology to be freely available in the market. You can keep yourself to date on computer technology trends by reading online computing magazines and message boards, talk to your local PC technician or a friend who is somehow inclined in computer technology, or subscribe to magazines geared towards computer technology for consumers. Try to learn a little about the technology being sold, and try to seek opinions from people who currently have the technology that you are gearing for. With a little amount time spent on research, you will have saved yourself from buying something that could get outdated a month or something that does not meet your expectations. Take time on deciding whether to have and old PC or laptop repaired or buy a new one.
How to get rid of windows registry errors and avoid slow PC Performance
Posted by nika perales | 1:32 AM | Windows Tutorials, Windows XP Guides | 0 comments »If you are looking for ways to speed up your personal computer; so you can do more tasks at one time without having to worry about your computer freezing up in the middle of a very tedious project and seeing all sorts of windows error messages and worst the BSD ( Blue Screen of Death). This article would like to show you some of the easiest things you can do to avoid these problems.
Many people experience PC problems at one point or another; and it can really be be very frustrating half the time. If you are PC is currently running rather slower than the usual; it may mean that your registry may need some cleaning. Most people do not clean their windows registry maybe because they do not have the technical knowledge on how to go about cleaning the windows registry. It is very much advisable to have your windows registry cleaned at least once a month or once every two months would just be fine if you are really a very busy person. PC like automobile also needs some sort of maintenance for it to perform very well.
Pretty much unlike your vehicle; your PC only requires maintenance every once in a while. It will however let you know when it needs the maintenance based on the current performance of your PC.
One of the best ways to speed up computer performance is to perform registry clean-up:
By maintaining a regular registry maintenance you are at best assured that your PC will run smoothly and at its best possible performance.
The registry are like the bolts and screws that holds the entire windows settings. The windows registry is somewhat alike to the human skeletal system, it keeps us upright and able to do just about anything we please. If the registry becomes corrupted you will notice a change in your computers performance or possibly get the entire windows operating system non-operational.
There are many softwares you can use to clean the registry; as a matter of fact if you google "registry cleaners" you will be stunned by over a million results. That is because you are not the only one who has ever tried to find ways to speed up computer by cleaning up the windows registry; this softwares will do the entire job of cleaning the registry even if you have a little know how about the windows registry.
A good registry cleaner will scan and repair your problems and conflicts that could possibly appear in the windows registry; and it will not take any more knowledge on your part than knowing how to run the software you chose.The best thing is to consult the user manual for whatever software you chose.
If you are presently not into cleaning the windows registry by at least once a month; you are missing out. My personal choice for such registry cleaners is “CCleaner”, it fixes everything that needs to be fixed and clean out the useless entries in the windows registry.
In closing one of the best ways in getting the most out of your PC's speed is a regular maintenance, which only takes a little time on your part.
Are you a skilled ASP.NET professional with strong web site and web application development experience? If so, we have a fantastic opportunity for you! Zallas Technologies, Inc. is a web development company that is now adding a new location in Manila region. This is a great opportunity for talented and motivated programmers to do the best work of their lives. Strong English skills are preferred!
What you need to apply:
- 3+ years experience in web development
- 3+ years experience of ASP/.Net programming
- CVS usage
- Other technologies like PHP, Perl, Java, AJAX, etc. are not required, but preferred.
What's in it for you:
- Competitive pay depending on experience
- Excellent growth and learning opportunities
- Dynamic, fast paced and fun work environment
If you feel you meet the minimum standard above, I would like to speak with you and for both of us to explore the wonderful opportunity available at Zallas Technologies.
Please include your Skype id and the best time to reach you, along with your resume and a list of projects you have successfully completed in the last 3 years.
Date: 7 March 2009
City/Town: Manila
Location: Manila
Wage/Salary: Competitive and Reasonable!
Start: Immediately
Duration: Long-Term
Type: Full Time, Home Based
How to apply: cxxxxxxxx@xxxxxx.xxx
Company: Zallas Technologies, Inc.
Contact: Kathy Garcia
Phone:
Fax:
Email: careersph@zallas.net


